The red velvet flavor trend is so hot that it’s literally on fire these days. But if you read my last post, you might want to think twice before indulging in a red velvet treat.
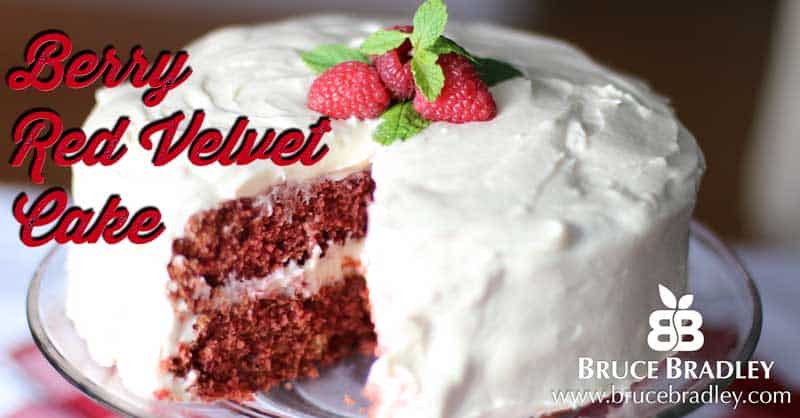
So that got me thinking … would it be possible to create a red velvet cake that uses real ingredients? Although I honestly can say I underestimated this challenge, many hours and several cakes later, I did it! Although the taste is a little bit different than the traditional red velvet cake (I think better 🙂 ), it truly is a delicious treat and perfect for a special occasion. Yes, it’s not as easy as a box cake recipe, but then again … shouldn’t desserts be something special? I think so!
The trademark appeal of red velvet cake is its red color. While I would argue some red velvet products take the red color to an absurd, bizarre, almost neon place, the bottom line is a red velvet cake has to be red. And this creates several challenges, especially when using only real ingredients:
- Whole wheat flour versus white all purpose flour: While I don’t think using all purpose flour occasionally is awful, I really prefer baking without it if all possible. Whole wheat pastry flour makes this pretty doable, but they create a little browner crumb than traditional all purpose flour. So when trying to get an appealing red color for your cake, the slightly browner cake color whole wheat pastry flour yields does present an additional challenge.
- Using the right amount of cocoa: Achieving a great red color can also be challenging if you add a lot of cocoa. I researched many traditional red velvet cakes, and found out they don’t use much cocoa. In fact, many of the recipes called for only a teaspoon of cocoa (and a whole bottle of food coloring—yikes 😯 ). I experimented with different levels of unprocessed, natural, organic cocoa. While I decided two teaspoons achieved a nice subtle, chocolate raspberry taste, you can definitely use more. Just realize the more cocoa you use, the less brilliant the red color of your final cake.
- Getting a great red color from real ingredients: Since using commercial food coloring was out, I tested several different ways to get a brilliant red color naturally. Beets are probably the most traditional source of natural red coloring. But let’s face it, if you add too many beets to a cake, you get a very earthy taste. So I created a delicious raspberry and beet puree that’s not only wonderfully red, but also gives a hint of berry flavor to the final cake. That’s why I would never call my recipe a true Red Velvet Cake. So instead, I call it Berry Red Velvet Cake!
- Keeping the pH acidic: Unlike cooking, baking (even when using real ingredients) involves some basic understanding of chemistry when writing a recipe from scratch. Without going into a lot of detail, one of the challenges of maintaining a great red color after baking cake is related to keeping the cake’s pH fairly acidic. This means minimizing ingredients that can be more alkaline like baking soda. It’s also why many traditional recipes use white vinegar. So in order to play up the acidity of the cake batter I decided to use my best lemon cake recipe as the base for the Berry Red Velvet Cake.
Well, that’s enough background. I just wanted folks to understand some of the “whys” behind my ingredient choices. Making on the fly adjustments with cakes like this can really make results vary! So, without further adieu, let’s get on with the recipe for this delicious cake and the traditional cream cheese frosting that goes with it!
Print
Recipe: Berry Red Velvet Cake
5 Stars 4 Stars 3 Stars 2 Stars 1 Star
5 from 6 reviews
- Author: Bruce Bradley
- Total Time: 1 hour 30 minutes
- Yield: 12 slices 1x
Ingredients
Berry Beet Puree:
- 10 ounces frozen raspberries (about 2 cups)
- 1 medium beet (peeled and grated)
Cake Ingredients:
- 1 cup raspberry beet puree (see below)
- 1 1/2 sticks unsalted butter (at room temperature)
- 1 3/4 cups granulated sugar (when I use sugar, I recommend organic, free trade)
- 2 large eggs (at room temperature)
- 1 1/2 tablespoons grated lemon zest (2 to 3 lemons)
- 2–4 teaspoons cocoa (organic, unsweetened, natural — not dutched or processed with alkaline)
- 2 1/4 cups whole wheat pastry flour
- 1 1/2 teaspoons baking powder
- 1/2 teaspoon baking soda
- 1 teaspoon kosher salt
- 4 tablespoons freshly squeezed lemon juice
- 1/2 cup buttermilk (at room temperature)
- 1 teaspoon pure vanilla extract
Cream Cheese Frosting Ingredients:
- 16 ounces cream cheese (at room temperature)
- 1 stick butter (at room temperature)
- 2–4 tablespoons half and half or milk
- 2 teaspoons vanilla extract
- 4 + cups powdered sugar
Optional Garnish:
- mint leaves
- raspberries
Instructions
Berry Beat Puree Directions:
- Heat frozen raspberries until soft (either in a small saucepan on the stove or in the microwave). Process the raspberries in a food mill to get a seedless puree.
- Using a high quality blender, blend the raspberry puree and grated beet for about 90 seconds or until completely smooth. This will yield about 1 cup of berry beet puree. Set aside.
Cake Directions
- Preheat oven to 350F degrees. Grease and flour 2, 8-inch or 9-inch round pans. For best results you may also want to line the bottom of the pans with parchment paper.
- Mix together flour, cocoa, baking powder, baking soda, and salt. For best results sift. Set aside. In a separate bowl mix together buttermilk, lemon juice, and vanilla. Set aside.
- In a third bowl cream butter and sugar until light and airy. Add eggs one at a time. Then add lemon zest. Add one cup of flour mixture, then half of the buttermilk mixture and mix briefly. Add the remaining flour and buttermilk mixtures. Also add one cup of berry beet puree. Fold together the batter gently. Don’t overmix! The goal is to have the batter mixed (no pockets of flour or streaks of color), not beaten until exceptionally smooth.
- Divide batter between prepared cake pans. Bake at 350F for 25-35 minutes. Once cake is firm (center does not giggle), test with a toothpick for doneness. Toothpick should come out clean.
- Place cake pans on cooling racks. Let cakes cool 15 minutes and remove carefully from the pans. Let cakes cools completely then frost.
Frosting Directions:
- In a stand mixer use the beater blade to blend the cream cheese and butter until creamy. Add 2 tablespoons of milk or half and half and vanilla extract. Beat until smooth. Add powdered sugar one cup at a time.
- Once fully blended, if too stiff, add a bit more milk. If not stiff enough, add more powdered sugar until you get your preferred consistency. Frost your cake, garnish, and enjoy!
Notes
We recommend using organic ingredients when possible. Also we prefer using eggs from pasture-raised chickens.
We always make fresh baking powder at home. It’s super easy and avoids the aluminum that’s in many store-bought varieties. To make your own just mix two parts cream of tartar with one part baking soda. Make just enough for the recipe or store any extra for up to four weeks in an airtight container at room temperature.
If you prefer to make cupcakes, recipe will yield about two dozen. Bake until a toothpick inserted into the center comes clean, about 18 to 24 minutes.
I recommend using raw beets in the berry beet puree. Although shredding and pureeing the beets is a little tedious, it’s quicker than roasting the beets AND it yields a more brilliant red color. Just make sure the beets are pureed well since you’ll definitely taste any beet bits in your cake.
- Prep Time: 1 hour
- Cook Time: 30 minutes
- Category: Desserts & Treats
Kitchen Tips and Resources:
- The secret to this recipe is getting a very smooth berry beet puree. I experimented with several different ways to do this, and this is the best one I came up with. It involves running thawed raspberry through a food mill (I use an OXO Good Grips mill), and then pureeing grated beets and the de-seeded raspberry in a blender (I use my Blendtec blender to do this and it works perfectly).
- I love my microplane zester for the lemon zest, and a Cuisinart food processor or a microplane coarse hand grater for the beets.
- If you’ve never baked cakes using parchment paper you should definitely give it a try. Butter and flour your cake pans, then insert a piece of parchment paper you’ve cut out to match the size of your pan. Gone are the days of cakes not coming out easily! Here’s the type of parchment paper I use—it’s unbleached and Green Seal Certified.
- When you’re baking cakes you really need some racks to get them to cool off quickly. I love these tiered cooling racks since they’re perfect for cakes or cookies … and they can save you some kitchen counter real estate!

GET MY FREE BOOK NOW!
End the confusion! Learn what’s really in your food and how to take simple steps toward eating healthier!
EAT HEALTHIER TONIGHT!
If you enjoyed this article or recipe may I ask you a favor? Please share it with a friend. Why? Because together we can make a difference and help each other live happier and healthier lives. Thank you!



8 Responses
I’m attempting this cake this weekend, I have all the ingredients ready. It looks and sounds delicious! I have a question though. At what point is the raspberry/beet puree added to the batter? I don’t see that in the directions. Thanks for your help.
I just updated the recipe to make it clearer. The berry beet puree is added as the last step of making the cake batter. Thanks so much for the great question!
So delicious! Made this last year and came back for the recipe to make it again for Valentines Day. Yum!
Hi! What do you suggest for process the raspberries without a food mill?
Hi Marcia! Thanks for visiting my site and for your question. Although a food mill definitely makes this easier, you can use a fine mesh strainer. Simply place the heated berries in the strainer over a large bowl. Force the puree from the berries by gently pressing the berries with the back of a spoon. Discard the seeds that remain in the strainer and set aside the raspberry puree for use in the cake.
Hope this helps. Enjoy this amazing recipe, and please come back and rate it if you have a chance. It’s one of my favorites!
Cheers!
Bruce
Hi! I made you recipe twice now, I have been in search for a red velvet without nasty food coloring. I absolutely love the flavor,texture, moistness etc. of your cake. However, both the times I made it, it looked like the red from the puree floated to the top leaving the bottom brown. I use organic everything on a daily basis so there was nothing different that I used from your recipe. Any advice or help would be appreciated!
Thank you,
Venus
Hi Venus!
Thanks so much for visiting my blog and leaving a comment. Sorry it has taken me so long to reply–I haven’t been blogging lately.
With regards to your question, on a couple occasions, I’ve observed the browning you’re speaking of. My guess is that since the red in this red velvet cake it totally natural, the color may loose it punch when it gets too hot (like on the bottom of the pan). A couple options would be to place your cake pans on a higher rack in the oven. Or, you might also experiment with cooking the cakes in their pans in a water bath.
Let me know if you have any success with these ideas or have come up with a solution of your own!
Cheers!
Bruce
I tried out a cake with the above recipe. The cake was very soft and tasty. Thank you.